
Did you ever just feel like getting dressed up? You know, slicking back your hair and putting on your fanciest bowtie?

Makes a dog feel pretty good!
Check out my 5 minute no sew bowtie! 
Did you ever just feel like getting dressed up? You know, slicking back your hair and putting on your fanciest bowtie?
Makes a dog feel pretty good!
Check out my 5 minute no sew bowtie!
When I came across this DIY project on pinterest, it inspired me to create something similar for all the dog (and dachshund) lovers out there! So I enlisted the help of my mom and whipped up this fun DIY project…

DIY Dachshund Cork Board
This project can be made using any dog shape (not just a dachshund), so have fun, be creative, and create something unique!

Materials:
*links contain affiliate links
Step 1: Adhere your cork onto a piece of cardboard using glue or a spray adhesive to make it a bit sturdier.
Step 2: If you would like to make a dachshund cork board download and print my dachshund shape, then cut it out. Otherwise you can print out a photo of your own dog (making sure to enlarge it) and cut out around the shape.

Step 3: Using a sharpie trace around your stencil on your cork board.

Step 4: Cut out your cork board shape using an exacto knife.

Step 5: Place your frog tape in a striped pattern along the cork.

Step 6: Paint onto the cork between your tape with acrylic paint, when it’s dry peel away the tape.

Step 7: Cut a strip of ribbon to be used as a collar and staple or glue it to the cork on the back.

Now you’re ready to hang your cork board up and enjoy!

I’ve now got the perfect place to pin photos of all my girlfriends!
When I spotted this Chalkboard Dog Bowl over on Waggo I just knew I had to have it! Only when I asked mom if I could purchase it, she suggested why not DIY it? Oh but of course!

DIY CHALKBOARD DOG BOWL
Materials:


Step 1: Using the frog tape, tape off the portion of your bowl that you do not want to have chalkboard paint on it. You may need some help from someone who doesn’t have paws!


Step 2: Using even coats, spray your bowl with chalkboard paint. You may also need some help to get the cap off your spray paint.


Once your bowl is completely dry it will be ready to write on with chalk! You may want to prep the surface first by applying a coat of chalk evenly across the entire bowl and erasing it before writing on it.

Of course any dog bowl is much much better with food in it!

Yum! Everything tastes better in my trendy Chalkboard Food Bowl!
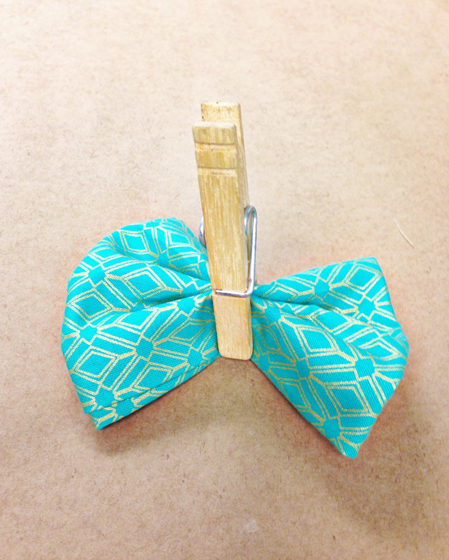
You all know I love a good DIY project, and when it takes less then 5 minutes and requires no sewing (for my mom who is not so handy with a needle and thread) it’s just an added bonus!

So for Easter this year my mom helped me whip up some quick DIY Bowties that I can wear when all my family comes to visit on Sunday. They’re so fun and easy to make that I can’t even decide which one to wear!
5 Minute No Sew DIY Easter Bowtie for your Pet

What you need:
Step 1: Cut a long rectangular piece of fabric (Mom cut mine 5″ x 19″ to make my small bow tie). The longer and wider you make your rectangle the bigger your bow tie will be. You will also want to cut a thinner strip of fabric, mine was 2″ x 19″, to be used later.
Step 2: Using your large rectangular piece of fabric fold in the edges. You can use an iron to crease the folds if need be.

Step 3: Next fold your ends towards the center so that they just overlap where the center mark would be.


Step 4: Fold the entire piece of fabric in half.

Step 5: With the front of your bowtie facing you, crease it into 3 even pleats. Then place a clothespin on it to hold it in place while you move to the next step.

Step 6: Using the small strip of fabric you cut, fold in the edges.

Step 7: Wrap the thin strip of fabric around your bowtie and tie in a double knot in the back.


Step 8: Tie your Bowtie around one of your dogs collars, trimming any excess fabric if need be.

You’re now ready for an Easter Party!

Now if I could only decide which one to wear!

P.S. I expect to see lots of dogs in dapper bowties this Easter! Post your dog in their best bowtie on my Facebook wall so we can enjoy them all!
Valentine’s Day is almost here, so with a little help from my mom I whipped up this happy heart DIY to help you spread some love any day of the year!

DIY – Dog Collar Heart Accessory
This simple DIY can be made with a few items that you can likely find laying around your house.
What you need:

Step 1: Using a sharpie draw two small heart shapes onto your fabric. You may want to draw one on a plain piece of printer paper first and cut it out to use as a stencil.

Step 2: Cut both hearts out of your fabric.

Step 3: If you are using a plain piece of fabric then you may want to add a little Bling. By using the eraser end of your pencil you can stamp some dots of gold metallic paint onto your fabric hearts.

Step 4: Next measure the width of your dog collar, add about an inch, and cut this length out of your elastic. Once your paint is dry on your hearts you will want to sew a piece of looped elastic to the painted side with a needle and thread.

Step 5: Place your heart cutouts on top of each other (paint side up) and begin to stitch the two together using a piece of embroidery floss (or regular thread if that’s all you have). Stop stitching when you are about 3/4 of the way around.

Step 6: Stuff your heart with cotton filler (or any other stuffing you would like to use) and then stitch your heart the rest of the way shut.

Your heart collar accessory is now complete, and you can slip it onto your dog’s collar.


I don’t know about you, but I think it totally says I LOVE YOU!

If you decide not to add paint to your happy little heart, you may want to use a fun fabric instead – just like the one my mom made below.

I’m totally wearing my heart on my sleeve neck!

If you’re looking for more ways to spread a little love this year, make sure you check out my online SHOP for Valentine’s Day Greetings and more!
The collars I am wearing in this feature are from the lovely Mattie & Margot, and they have lots of great colors that would look oh so sweet with a happy little heart on them.
Also you can fetch the id tag I’m wearing above from Blanket ID.
DIY and Cookies, what’s more to love? Today I have a very special holiday diy to share with you, it’s simple, it’s easy, and it involves cookies!

DIY Holiday Dog Cookie Jar

Supplies:

Step 1: Lay out your painters tape on a cuttable surface (self-healing mats work great) and trace around your dog bone shaped cookie cutter (or any stencil you would like to use).

Step 2: Cut the shape out with an exacto knife.
Step 3: Position your cut-out shape on the mason jar where-ever you would like it.

Step 4: Spray paint the jar in any color you would like.
Step 5: When the jar is dry remove the painters tape and fill with your favorite cookies!

I filled my jar with some peanut butter cookies from the Three Dog Bakery, but if you are looking for some recipes you might want to check out this E-book from Pretty Fluffy.
My new DIY Holiday Dog Cookie Jar would make the perfect gift this holiday to give to my best friend Trooper, however my tummy might have the final ruling on this one. I’m sure Trooper won’t mind if I eat just a few!
One of my favorite things about the holidays is decorating the house with lots of Christmas Cheer! So this year my mom decided to help me make some festive ornaments to hang on my tree. These DIY Holiday Dog Ornaments will add a little WOOF to any home!

Supplies:


Step 1: After choosing photos of your pet to use (it helps if they have a white background) print them out on your iron-on transfer paper. Follow the directions on the package for printing, and remember to mirror your image.

Step 2: Cut your images out of the print-out.
Step 3: Iron on your images to your white fabric, making sure you follow the directions on your iron-on transfer paper package.

Step 4: Cut each image out of your fabric, making sure to leave at least a 1 inch space around each image. By using something as a template you can also cut them out in the shape of a circle, which will be easier to sew down the line.

Step 5: Next you will want to cut shapes out of your colorful Christmas fabric that are the same size as the images. These will serve as the backing for your ornament.

Step 6: Using the baker’s twine you’ll want to cut a small piece and tie it into a bow. Then with your needle and thread stitch your bow onto the image transfer of your pet.

Step 7: Then you will want to sew your ornament together. Place your colored fabric ONTOP of your image and then using your sewing machine (or by hand) stitch nearly all the way around your ornament, leaving about a 1/2 an inch of the fabric un-sewn.
Step 8: Flip your sewn ornament inside out so that now the image is on the outside. Then stuff with cotton.
Step 9: Cut a piece of bakers twine to be used to hang your ornament and knot it into a loop. Then using a needle and thread stitch the top of your ornament (and the loop) closed.

Step 10: Marvel in your diy-ness and enjoy your new ornaments!

I’m thoroughly enjoying my new ornaments, and I think they’re super cute !


I bet you can guess which one’s my favorite!
*The photos used for my ornaments were from the lovely Brenda Carpenter & The Mutt Room!
One of my most popular tricks is the Play Dead trick. Guaranteed to make children giggle and adults oooh and ahhh – it’s a favorite that’s sure to win them over!
Most all of my tricks are taught and mastered with the help of clicker training, so before beginning you might want to read up on how to introduce your dog to a clicker*.
*Disclaimer: this post does contain some affiliate links

Teach Your Dog to Play Dead
Every great dog should know how to play dead – if only to be used as an ice breaker at parties, to scare the ground hogs in the backyard, and to generally just make you look totally awesome.
What you need: A handful of small training treats*, clicker
Step 1: To start your dog should already know how to lay down on command. Place a few treats in a fist and place your hand on the ground in front of your dog as you ask them to lay down.

Step 2: As your dog sniffs the treat tilt your fist up and over the top of your dog’s head, encouraging them to lay on their side. You may need to gently push your hand into your dog to entice them to lay on their side. Click and Reward your dog as soon as their side touches the ground.

Step 3: Continue asking your dog to lay on their side with treats in the fist of your hand until you can ask them to lay on their side with just an open palm (treats removed) – then click and reward.

Step 4: Once your dog is laying on their side consistently you can begin to add a verbal and visual command to it. Point your finger at your dog and say Bang, Bang – if your dog doesn’t immediately flop on their side you can then use the open palm of your hand to remind them what to do, click and reward. Slowly begin waiting longer and longer to show them what to do with the flat of your hand until they offer laying on their side on their own. Jackpot treat your dog when they get it right.

Step 5: When your dog is consistent in laying on their side when you ask you will need to add a release word. Part of the appeal of a play dead trick is that your dog will “remain dead” until you tell them to come back alive. So after asking your dog to play dead, wait a few seconds and say OK (before your dog gets up on their own) to release them and then click and reward. The key is to time this right before your dog gets up on their own. Gradually begin asking them to stay on their side longer and longer until you are certain they will not get up until you give them the verbal OK.

Congratulations! Your dog can now play dead! You can now bring laughter and smiles to everyone!
Disclaimer: The Let’s Get Tricky blog feature is designed to provide general information, instruction, and techniques that may not be suitable for everyone. Please note that we are not liable for any of your activities while attempting to teach your dog the techniques listed on this blog. Please train responsibly.
Learn how to teach your dog to high-five!
I was such a good boy at my Canine Good Citizen and Therapy Dog Test on Sunday that Mom made me an extra special treat when I got home.

You might remember the Polka Dog Bakery DIY Sweet Potato Dog Cookie Recipe I posted about a few weeks ago – well Mom decided to make me some as a reward for all my hard work!

First Mom sliced up some sweet potatoes for me.

Then we let them soak in a bowl of chicken broth for about 1/2 hour.

While they soaked I sat on my bed in the kitchen just counting the minutes until they would be ready. It was a whole lot of minutes.

Then after baking them for 15 minutes at 400 Degrees I had to wait a whole bunch more minutes for them to cool.

Finally my good dog treats were ready for their taste test!

Of course wouldn’t you know that mom made me practice my leave it command before I was allowed to eat them!

In the end it was worth the wait, because they were yum! Perhaps I should be a good boy all the time.
You can find the entire recipe for DIY Healthy Sweet Potato Dog Cookies HERE.