A DIY Solution for Sharing the Bed Comfortably with Your Dog

Oh The Places You Sleep: Vol. 6 with Ammo the Dachshund

I’m very lucky in that ever since I can remember mom and dad have allowed me to share their big dog bed with them. Everyone has always slept soundly at night with all of us together (some of us snoring louder than others), but still relatively peacefully.

A DIY Solution for Sleeping Comfortably with your Dog

Then suddenly things changed when I found out we had a 4th family member sharing the big dog bed too (my new little sister), and mom decided she could no longer sleep with me digging my paws into her ribs at night.

A DIY Solution for Sleeping Comfortably with your Dog

Thats when this funny looking pillow called a Snoogle* showed up in our bed. Mom said it was supposed to help her sleep, but after about a week I had commandeered the Snoogle all to myself!

*affiliate link

A DIY Solution for Sleeping Comfortably with your Dog

With a combination of pillows, rolled up blankets and the Snoogle I was now corralled into the center of the bed so that everyone could sleep soundly at night again. That is until Mom decided she wanted her pillow back!

So instead of relegating me to the couch at night (I’m much too important to sleep on the couch!), Mom came up with a DIY Solution so that we could all sleep comfortably again.

A DIY Solution for Sleeping Comfortably with your Dog

Mom made me this super cool bumper type pillow to keep me in the center of the bed at night (and from kicking everyone) so that she could take her pillow back. So far it’s been great, and I’m even enjoying having some of my own space at night too!

Since I’m sure there are a lot of dog’s out there that share the giant dog bed with their humans I thought I would share just how my mom made it:

A DIY Solution for Sharing the Bed with Your Dog!

A DIY Solution for Sleeping Comfortably with your Dog

What you need:

  • Fabric (We bought 3 yards of sweatpant type material which was plenty enough to make the bumper pictured – but since you could make this in any size you want you might have to adjust how much material you buy)
  • Ribbon
  • Scissors
  • Stuffing (we used some old pillows we had laying around the house)
  • Sewing Machine & Tread

A DIY Solution for Sleeping Comfortably with your Dog

Step 1: Cut your fabric into 12 inch x 8.5 foot strips. This makes the size pillow you see me pictured with, and if your fabric is not long enough for 8 feet you can cut more than one strip and attach them together (which is what we did). My pillow turned out to be a pretty good size, but mom said if she made it again she might make the thickness a little bigger. Also, you can certainly adjust this size for different sized dogs, bigger sides and longer for big dogs, and maybe a shorter length for smaller dogs.

A DIY Solution for Sleeping Comfortably with your Dog

Step 2: Fold your strips of fabric length wise in half with the inside facing out and stitch along the long side to create a “tube” of fabric.

A DIY Solution for Sleeping Comfortably with your Dog

Step 3: Cut two circles out of your fabric 6 inches in diameter. Again this size can be adjusted depending on how big you plan to make your pillow.

A DIY Solution for Sleeping Comfortably with your Dog

A DIY Solution for Sleeping Comfortably with your Dog

Step 4: Cut a slit in the center of each of the circles for your ribbon to slip though and then attach with the sewing machine.

Step 5: Sew one of the circles onto the end of the fabric tube you created. Make sure if it’s still inside out that you sew the correct side onto the end.

A DIY Solution for Sleeping Comfortably with your Dog

Step 6: Flip your tube of fabric right side out and start to fill with stuffing. Since this pillow is over 8 feet long we found it helpful to use a broom handle to push the stuffing down the the bottom of the fabric so that it was tight and compact.

A DIY Solution for Sleeping Comfortably with your Dog

Now suddenly from my perspective you have a new snake buddy! But we’re not done…

A DIY Solution for Sleeping Comfortably with your Dog

Step 7: Now attach the other circle you cut to the end of your tube. Likely you will have to hand-stitch some of this to close it off completely.

A DIY Solution for Sleeping Comfortably with your Dog

Ta-da! You now have a pillow that can be used to corral your dog anywhere you like. The ties at the bottom are super helpful in keeping the pillow together (so I don’t kick my way out at night).

A DIY Solution for Sleeping Comfortably with your Dog

And as a bonus it can also be used to tie up the sides to make the walls of the pillow higher if need be.

A DIY Solution for Sleeping Comfortably with your Dog

I’ve really been enjoying my new “bed nest” and it’s definitely helped give my entire family a great nights sleep. In fact I’ve gotten so used to sleeping in it that when I had to sleepover at the farm the other night without it that I picked a spot at the end of the bed and curled up out of the way of everyone for the duration of the entire night. I guess I’ve just gotten so used to sleeping more independently that it’s what was most comfortable!

Does your dog share the bed with you at night? Do you think you’d co-sleep better with one of these pillows?Ammo the Dachshund // Blog Signature // Celebrity

K9 Couture Collars Review & Giveaway

Disclaimer: This post and giveaway is brought to you by K9 Couture Collars. As always, all opinions are 100% my own.

k9 Couture Collars Review & Giveaway // Ammo the Dachshund

My new friends at K9 Couture Collars recently sent me some new collars to update my wardrobe.

k9 Couture Collars Review & Giveaway // Ammo the Dachshund

At K9 Couture Collars they believe that just like shoes, you can never have too many collars! And I have to say I totally agree with this. As a dog, who wants to wear the same collar everyday? Certainly not me, I have too much fashion sense for that.

k9 Couture Collars Review & Giveaway // Ammo the Dachshund

Everything they make is hand picked, assembled and hand sewn by them.

And the designs – they have so many! Tons of styles and colors and if you don’t see what you’re looking for you can even request something custom.

k9 Couture Collars Review & Giveaway // Ammo the Dachshund

Most of their collars are made with a thick nylon webbing and fabric overlay, and you can choose the collar width you prefer for your dog. You can tell each stitch is done with the utmost of care! They have many different styles and can come with plastic buckles or metal buckles and with a choice of standard buckle or martingale options.

k9 Couture Collars Review & Giveaway // Ammo the Dachshund

Personally I adore this gold metal buckle collar in mint julep. My mom prefers the metal buckles as they seem to be much sturdier and stronger. And at K9 Couture you can choose whichever options you prefer best for your own dog’s collar.

k9 Couture Collars Review & Giveaway // Ammo the Dachshund

k9 Couture Collars Review & Giveaway // Ammo the Dachshund

I haven’t seen many collars on the market with gold hardware, and this one just screams….I’m fancy and I know it!

k9 Couture Collars Review & Giveaway // Ammo the Dachshund

So if you’re looking to add a little variety to your own dog’s wardrobe then you might want to check out K9 Couture Collars.

You can even head over and like them on Facebook for a 20% discount off your next order!

And now for the best part….

k9 Couture Collars Review & Giveaway // Ammo the Dachshund

TWO LUCKY WINNERS WILL WIN A COLLAR OF THEIR CHOICE FROM K9 COUTURE

Here’s HOW TO WIN:

To enter use the Rafflecopter widget below. By entering you will be added to the K9 Couture e-mail list. Winners will be chosen at random and you will be contacted via e-mail to claim your prize. All the winners will also be announced on this blog post once the giveaway ends. Open to WORLDWIDE readers. Winners must claim their prizes within 48 hours of being notified or prize will be forfeited. Good luck!

a Rafflecopter giveaway

Ammo the Dachshund

12 Days of Cheer! DIY Holiday Dog Collar Flair

12 Days of Cheer! DIY Holiday Dog Collar Flair // Ammo the Dachshund

Yippee! It’s almost Christmas! And to get in the holiday spirit, I thought I’d share my fun an easy DIY for some holiday dog collar flair!

12 Days of Cheer! DIY Holiday Dog Collar Flair // Ammo the Dachshund

Here’s what you’ll need:

12 Days of Cheer! DIY Holiday Dog Collar Flair // Ammo the Dachshund

Following the directions that came with your fabric covered button kit, use your holiday fabric to create a button. For mine I used a 1″ kit.

12 Days of Cheer! DIY Holiday Dog Collar Flair // Ammo the Dachshund

Choosing a smaller pattern works best and may depend on the size of your button.

12 Days of Cheer! DIY Holiday Dog Collar Flair // Ammo the Dachshund

Then simply tie a small piece of elastic to the back of the button loop that will securely hold your button to the collar (thin elastic works best).

12 Days of Cheer! DIY Holiday Dog Collar Flair // Ammo the Dachshund

Then slip it onto your dog’s favorite collar, and you’ve got yourself some holiday flair!

12 Days of Cheer! DIY Holiday Dog Collar Flair // Ammo the Dachshund

Simple, fun, and oh-so-festive!

12 Days of Cheer! DIY Holiday Dog Collar Flair // Ammo the Dachshund

12 Days of Cheer! DIY Holiday Dog Collar Flair // Ammo the Dachshund

They were so easy to make that now I can’t decide which ones to wear….perhaps I should just wear them all!

12 Days of Cheer! DIY Holiday Dog Collar Flair // Ammo the Dachshund

Make sure to post your dog’s holiday flair on my Facebook page, so we can all join in on the festive fun! Happy Holidays! Ammo the Dachshund

Recovering an Ottoman with a Helping Paw

Easter Egg Hunt for the Dogs // Ammo the Dachshund

This is my sunroom, my favorite room in the whole house. (Don’t mind the easter eggs and the snow outside – this was taken earlier this year). I spend a lot of time in here, since it’s got the best view! See that ottoman in the middle, well I also spend a lot of time on that sunbathing. Which is also the reason why mom decided that the fabric needed to be changed (on account of my “sometimes” muddy paws).

Now I’m no stranger to furniture restorations, I’ve helped mom repaint chairs, and dressers – but this would be my first fabric recover!

Furniture Restoration // Ammo the Dachshund

So mom broke out the tools, but that’s not really how this Dachshund rolls – especially when you have some built-in tools of your own…..

And thanks to me, about an hour later I was looking at my brand-new ottoman!

Furniture Restoration // Ammo the Dachshund

Furniture Restoration // Ammo the Dachshund

Covered with a charcoal grey sunbrella fabric, mom says it’s designed to take a bit more of a beating than what was previously on it.

Furniture Restoration // Ammo the Dachshund

As long as these paws are still allowed on the furniture than it’s A-OK with me! Ammo the Dachshund

Dressed up Dachshund

Dog in Bowtie // Ammo the Dachshund

Did you ever just feel like getting dressed up? You know, slicking back your hair and putting on your fanciest bowtie?

Dog in Bowtie // Ammo the Dachshund

Makes a dog feel pretty good!

Check out my 5 minute no sew bowtie! Ammo the Dachshund

Friday Fetch: Dog Harnesses from Ginger’s Wonders

I came across this interesting harness design from Ginger’s Wonders on Etsy and was intrigued. I like a good harness that gives me freedom of movement, and these harnesses seem to do just that. Plus they come in some fun colors and patterns, perfect for some summertime fun!

Friday Fetch: Dog Harness from Ginger's Wonders // Ammo the Dachshund

Friday Fetch: Dog Harness from Ginger's Wonders // Ammo the Dachshund

Friday Fetch: Dog Harness from Ginger's Wonders // Ammo the Dachshund

Friday Fetch: Dog Harness from Ginger's Wonders // Ammo the Dachshund

Friday Fetch: Dog Harness from Ginger's Wonders // Ammo the Dachshund

Friday Fetch: Dog Harness from Ginger's Wonders // Ammo the Dachshund

That houndstooth pattern certainly looks good on my fellow dachshund friend!

You can fetch these dashing harnesses from Ginger’s Wonders for around $30! Ammo the Dachshund

5 Minute No Sew DIY Easter Bowtie for your Pet

You all know I love a good DIY project, and when it takes less then 5 minutes and requires no sewing (for my mom who is not so handy with a needle and thread) it’s just an added bonus!

5 Minute No Sew DIY Easter Bowtie for your Dog // Ammo the Dachshund

So for Easter this year my mom helped me whip up some quick DIY Bowties that I can wear when all my family comes to visit on Sunday. They’re so fun and easy to make that I can’t even decide which one to wear!

5 Minute No Sew DIY Easter Bowtie for your Pet

5 Minute No Sew DIY Easter Bowtie for your Dog // Ammo the Dachshund

What you need:

  • Scissors or Rotary cutter
  • Ruler
  • Fabric
  • Iron (optional)

Step 1: Cut a long rectangular piece of fabric (Mom cut mine 5″ x 19″ to make my small bow tie). The longer and wider you make your rectangle the bigger your bow tie will be. You will also want to cut a thinner strip of fabric, mine was 2″ x 19″, to be used later.

Step 2: Using your large rectangular piece of fabric fold in the edges. You can use an iron to crease the folds if need be.

5 Minute No Sew DIY Easter Bowtie for your Dog // Ammo the Dachshund

Step 3: Next fold your ends towards the center so that they just overlap where the center mark would be.

5 Minute No Sew DIY Easter Bowtie for your Dog // Ammo the Dachshund

5 Minute No Sew DIY Easter Bowtie for your Dog // Ammo the Dachshund

Step 4: Fold the entire piece of fabric in half.

5 Minute No Sew DIY Easter Bowtie for your Dog // Ammo the Dachshund

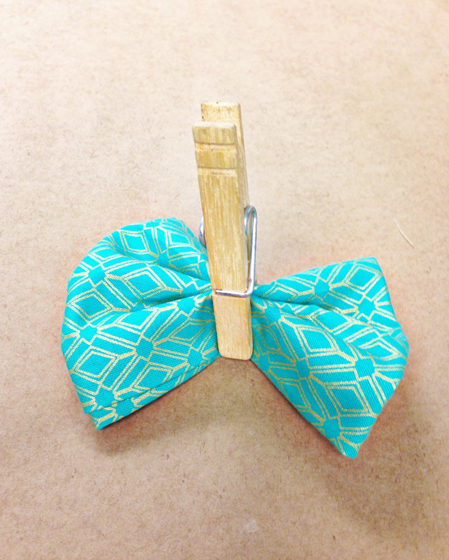
Step 5: With the front of your bowtie facing you, crease it into 3 even pleats. Then place a clothespin on it to hold it in place while you move to the next step.

5 Minute No Sew DIY Easter Bowtie for your Dog // Ammo the Dachshund

5 Minute No Sew DIY Easter Bowtie for your Dog // Ammo the Dachshund

Step 6: Using the small strip of fabric you cut, fold in the edges.

5 Minute No Sew DIY Easter Bowtie for your Dog // Ammo the Dachshund

Step 7: Wrap the thin strip of fabric around your bowtie and tie in a double knot in the back.

5 Minute No Sew DIY Easter Bowtie for your Dog // Ammo the Dachshund

5 Minute No Sew DIY Easter Bowtie for your Dog // Ammo the Dachshund

5 Minute No Sew DIY Easter Bowtie for your Dog // Ammo the Dachshund

Step 8: Tie your Bowtie around one of your dogs collars, trimming any excess fabric if need be.

5 Minute No Sew DIY Easter Bowtie for your Dog // Ammo the Dachshund

You’re now ready for an Easter Party!

5 Minute No Sew DIY Easter Bowtie for your Dog // Ammo the Dachshund

Now if I could only decide which one to wear!

5 Minute No Sew DIY Easter Bowtie for your Dog // Ammo the Dachshund

P.S. I expect to see lots of dogs in dapper bowties this Easter! Post your dog in their best bowtie on my Facebook wall so we can enjoy them all! Ammo the Dachshund

12 Days of Cheer! DIY Holiday Dog Ornaments

One of my favorite things about the holidays is decorating the house with lots of Christmas Cheer! So this year my mom decided to help me make some festive ornaments to hang on my tree. These DIY Holiday Dog Ornaments will add a little WOOF to any home!

12 Days of Cheer! Ammo the Dachshund's DIY Holiday Dog Ornaments

Supplies:

12 Days of Cheer! Ammo the Dachshund's DIY Holiday Dog Ornaments

12 Days of Cheer! Ammo the Dachshund's DIY Holiday Dog Ornaments

Step 1: After choosing photos of your pet to use (it helps if they have a white background) print them out on your iron-on transfer paper. Follow the directions on the package for printing, and remember to mirror your image.

12 Days of Cheer! Ammo the Dachshund's DIY Holiday Dog Ornaments

Step 2: Cut your images out of the print-out.

Step 3: Iron on your images to your white fabric, making sure you follow the directions on your iron-on transfer paper package.

12 Days of Cheer! Ammo the Dachshund's DIY Holiday Dog Ornaments

Step 4: Cut each image out of your fabric, making sure to leave at least a 1 inch space around each image. By using something as a template you can also cut them out in the shape of a circle, which will be easier to sew down the line.

12 Days of Cheer! Ammo the Dachshund's DIY Holiday Dog Ornaments

Step 5: Next you will want to cut shapes out of your colorful Christmas fabric that are the same size as the images. These will serve as the backing for your ornament.

12 Days of Cheer! Ammo the Dachshund's DIY Holiday Dog Ornaments

Step 6: Using the baker’s twine you’ll want to cut a small piece and tie it into a bow. Then with your needle and thread stitch your bow onto the image transfer of your pet.

12 Days of Cheer! Ammo the Dachshund's DIY Holiday Dog Ornaments

Step 7: Then you will want to sew your ornament together. Place your colored fabric ONTOP of your image and then using your sewing machine (or by hand) stitch nearly all the way around your ornament, leaving about a 1/2 an inch of the fabric un-sewn.

Step 8: Flip your sewn ornament inside out so that now the image is on the outside. Then stuff with cotton.

Step 9: Cut a piece of bakers twine to be used to hang your ornament and knot it into a loop. Then using a needle and thread stitch the top of your ornament (and the loop) closed.

12 Days of Cheer! Ammo the Dachshund's DIY Holiday Dog Ornaments

Step 10: Marvel in your diy-ness and enjoy your new ornaments!

12 Days of Cheer! Ammo the Dachshund's DIY Holiday Dog Ornaments

I’m thoroughly enjoying my new ornaments, and I think they’re super cute !

12 Days of Cheer! Ammo the Dachshund's DIY Holiday Dog Ornaments

12 Days of Cheer! Ammo the Dachshund's DIY Holiday Dog Ornaments

I bet you can guess which one’s my favorite! Ammo the Dachshund

*The photos used for my ornaments were from the lovely Brenda Carpenter & The Mutt Room!

Birthday Week: DIY Pet Birthday Bandana

Birthdays call for celebration, and what better way to celebrate than a spiffy new bandana to let everyone know it’s your Birthday!

Birthday Week // DIY Pet Birthday Bandana // Ammo the Dachshund

And because I want everyone to celebrate with me, here’s a tutorial I created to help you make your own pet a celebratory bandana.

Birthday Week // DIY Pet Birthday Bandana // Ammo the Dachshund

DIY Pet Birthday Bandana

Materials:

*some links contain affiliate links

Birthday Week // DIY Pet Birthday Bandana // Ammo the Dachshund

Step 1: Using a ruler and cutting utensil, cut a bandana sized piece of fabric out of your material. We used a bandana I already had as a template, but you can also measure your pet’s neck and add about 4″ to be able to tie it. You might also opt to sew the edges of your bandana to prevent fraying before moving on to step 2.

Birthday Week // DIY Pet Birthday Bandana // Ammo the Dachshund

Step 2: You will need your HOORAY! stamp for this part (my mom carved mine, find out how to carve a stamp here or find out how to purchase one here). Use your sponge brush to apply screen printing ink or acrylic paint mixed with Textile Medium to the stamp.

Birthday Week // DIY Pet Birthday Bandana // Ammo the Dachshund

Step 3: Stamp your fabric in several places, re-applying paint after each one. Then allow to dry.

Birthday Week // DIY Pet Birthday Bandana // Ammo the Dachshund

Adding another color can add to the overall effect.

Birthday Week // DIY Pet Birthday Bandana // Ammo the Dachshund

And when you are all finished you will have a spiffy new bandana that’s perfect for celebrating my Birthday with me.

Birthday Week // DIY Pet Birthday Bandana // Ammo the Dachshund

Happy Birthday to me! Only 3 more days until I’m officially 4 and get to open all my presents!


My HOORAY! stamp was inspired by a post on Squirrelly Minds.Ammo the Dachshund

DIY Ombre Pet Bandana

DIY Ombre Pet Bandana via Ammo the Dachshund

Over the weekend mom and I had some fun with a little DIY project. I like to keep up with all the fashion trends, so I told mom I needed a stylish new Ombre Bandana for the summer! Ombre is new it thing, incase you didn’t know.

So here’s my super fun tutorial for a…

DIY OMBRE PET BANDANA

DIY Ombre Pet Bandana via Ammo the Dachshund

Supplies Needed:

  • Hanger (a plastic pant hanger works best)
  • Box of Dye (we ended up using a Royal Blue Color – not the pictured teal dye)
  • Cutting Tool (scissors or rotary cutter work fine)
  • Ruler or tape measure
  • White Fabric or Bandana (we used a white cotton jersey material, but the ombre color may show up better on a different material – we just didn’t have any on hand to experiment with) *we also pre-washed/shrunk our fabric before dying

DIY Ombre Pet Bandana via Ammo the Dachshund

Step 1: If you are using a piece of fabric vs. a pre-made bandana (sold at most craft stores, but better sized for a large dog), cut your fabric into a triangular shape that will fit your dog’s neck. Mom measured my neck then added 4″ to each side on the top to make room to tie it. Ex: my neck measured 12″ so we added 8″ total making the top measurement 20″ wide.

DIY Ombre Pet Bandana via Ammo the Dachshund

Step 2: Mix your dye as per the directions on the box. As a rule always add a little less water to your bucket – you can always add more water to dilute it later.

DIY Ombre Pet Bandana via Ammo the Dachshund

Step 3: Attach your bandana to the hanger.

DIY Ombre Pet Bandana via Ammo the Dachshund

Step 4: Dip the bandana 3/4 into the dye for about 5 seconds, then remove. Try to keep the bandana as level as possible when dipping into the dye.

DIY Ombre Pet Bandana via Ammo the Dachshund

Step 5: Next dip your bandana 1/2 way into the dye for 20 seconds.

DIY Ombre Pet Bandana via Ammo the Dachshund

Step 6: Remove the Bandana another 1/4 out of the dye so that just 1/4 remains in the dye. Leave it there for another 2 – 3 minutes. *you may have to experiment with dye times based on the type of fabric you are using and how quickly it soaks up the dye.

DIY Ombre Pet Bandana via Ammo the Dachshund

DIY Ombre Pet Bandana via Ammo the Dachshund

Remove from the dye and hang until dry.

DIY Ombre Pet Bandana via Ammo the Dachshund

The waiting is the hardest part!

DIY Ombre Pet Bandana via Ammo the Dachshund

When your bandana is dry you will have a stylish new accessory perfect for the summer! Yay!

DIY Ombre Pet Bandana via Ammo the Dachshund

Of course I had to break mine in by rolling in the stinkiest dead animal smell I could find. It was glorious!