Birthday Week: DIY Dog String Art

DIY Dog Nail Art // Woof // Ammo the Dachshund

Since I’m celebrating Birthday Week on the blog, I thought it would be fun to share a fun DIY for some dog inspired artwork! You’ll love this fun tutorial to add a little extra woof to your own home!

String Art isn’t a new concept, all you have to do is search pinterest and tons of examples will pop up. After seeing lots of fun renditions on the web I thought it would be fun to create my own design, with man’s best friend in mind!

DIY Dog String Art

DIY Dog Nail Art // Woof // Ammo the Dachshund

Supplies:

DIY Dog Nail Art // Woof // Ammo the Dachshund

Step 1: Tape your printed type onto your block of wood. You can really use anything from shapes to various words and even logos.

DIY Dog Nail Art // Woof // Ammo the Dachshund

DIY Dog Nail Art // Woof // Ammo the Dachshund

Step 2: Nail your brads along the inner and outer edges of your text.

DIY Dog Nail Art // Woof // Ammo the Dachshund

Step 3: Remove the paper.

DIY Dog Nail Art // Woof // Ammo the Dachshund

Step 4: Tie your string to one of the nails and begin winding around them in every which direction. It helps if you outline each of the letters with string before filling them in.

DIY Dog Nail Art // Woof // Ammo the Dachshund

Step 5: Continue this process for each of the letters until they are all filled in with string.

DIY Dog Nail Art // Woof // Ammo the Dachshund

Congrats! You now have some fun dog-inspired string art!

DIY Dog Nail Art // Woof // Ammo the Dachshund

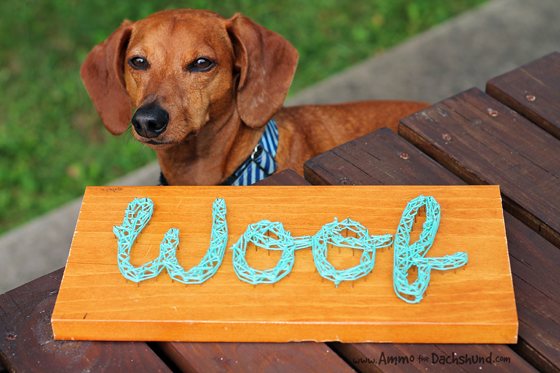
I think it turned out pretty fantastic, and I can’t wait to come up with some more fun designs!

DIY Dog Nail Art // Woof // Ammo the Dachshund

DIY Dog Nail Art // Woof // Ammo the Dachshund

DIY Dog Nail Art // Woof // Ammo the Dachshund

I can’t wait to see what fun string art you come up with! Be sure to share your String Art projects on my Facebook pageAmmo the Dachshund

12 Days of Cheer! DIY Easy Gold Dog Ornaments

With Christmas just around the corner Mom and I decided to add a little bling to our tree! (inspired by this tutorial) This super easy DIY is also great to use as gifts for all your doggie friends! So easy your could make these this weekend as gift toppers for all your gifts!

12 Days of Cheer! Easy DIY Gold Dog Ornaments // Ammo the Dachshund

12 Days of Cheer! Easy DIY Gold Dog Ornaments // Ammo the Dachshund

Materials:

12 Days of Cheer! Easy DIY Gold Dog Ornaments // Ammo the Dachshund


Optional Supplies:

12 Days of Cheer! Easy DIY Gold Dog Ornaments // Ammo the Dachshund

Step 1: Lay out a sheet of wax paper and using your rolling pin flatten out a piece of model magic that is large enough to fit your cookie cutter. Keeping it about 1/2″ to 1″ thick.

12 Days of Cheer! Easy DIY Gold Dog Ornaments // Ammo the Dachshund

Step 2: Press your cookie cutter into the model magic.

12 Days of Cheer! Easy DIY Gold Dog Ornaments // Ammo the Dachshund

Step 3: Tear away the excess and poke your bamboo skewer into the spot where you want the string for hanging to be.

12 Days of Cheer! Easy DIY Gold Dog Ornaments // Ammo the Dachshund

12 Days of Cheer! Easy DIY Gold Dog Ornaments // Ammo the Dachshund

Step 4: (optional) You can stamp a name or word into your ornament using the rubber stamps if you choose. It’s a great way to personalize them for all your friends! (no ink required as you will be painting them later)

12 Days of Cheer! Easy DIY Gold Dog Ornaments // Ammo the Dachshund

Step 5: Allow the model magic ornaments to dry for several days so that they harden. (they will harden faster if you set them near a heat source (not on it!) and remove them from the wax paper)

12 Days of Cheer! Easy DIY Gold Dog Ornaments // Ammo the Dachshund

Step 6: Once your ornaments have hardened you can add a few coats of gold spray paint (or really any color you like). Optional – add some glitter by sprinkling it on while your paint is still wet.

12 Days of Cheer! Easy DIY Gold Dog Ornaments // Ammo the Dachshund

Then just add some twine and your ornaments are ready to hang on your tree or gift to a friend!

12 Days of Cheer! Easy DIY Gold Dog Ornaments // Ammo the Dachshund

12 Days of Cheer! Easy DIY Gold Dog Ornaments // Ammo the Dachshund

Only thing that would make these better is if they were actually edible (which sadly they are not), paws crossed for edible dog bone ornaments for next year! Ammo the Dachshund

Shop with Ammo // Flying Hero Etsy Shop

12 Days of Cheer! DIY Holiday Pet Garland

Festive, fun, and made of COOKIES! This is totally my kind of DIY!

12 Days of Cheer! DIY Holiday Pet Garland using Milkbones! via Ammo the Dachshund

Mom helped me come up with a fun holiday garland to decorate my home with this year. I figured can’t hurt to make my home extra festive, because you never know what jolly round fellow might be stopping by in a few days!

12 Days of Cheer! DIY Holiday Pet Garland using Milkbones! via Ammo the Dachshund

DIY Holiday Pet Garland

Materials:


12 Days of Cheer! DIY Holiday Pet Garland using Milkbones! via Ammo the Dachshund

Step 1: Using your Electric Drill, drill holes through the pre-existing hole marks in your cookie. You can alternatively use an awl to push holes through them – but this method tends to crack the cookies easier.

12 Days of Cheer! DIY Holiday Pet Garland using Milkbones! via Ammo the Dachshund

Step 2: Spray paint your cookies a fun and festive color.

12 Days of Cheer! DIY Holiday Pet Garland using Milkbones! via Ammo the Dachshund

12 Days of Cheer! DIY Holiday Pet Garland using Milkbones! via Ammo the Dachshund

Allow them to completely dry before moving onto the next step, preferably overnight.

12 Days of Cheer! DIY Holiday Pet Garland using Milkbones! via Ammo the Dachshund

Step 3: Thread the bakers twine through the back of your cookies. A toothpick may be helpful to push the twine through them.

12 Days of Cheer! DIY Holiday Pet Garland using Milkbones! via Ammo the Dachshund

Step 4: You will want to knot the end of each piece of twine near your cookie so that it won’t slide around on the garland.

12 Days of Cheer! DIY Holiday Pet Garland using Milkbones! via Ammo the Dachshund

Step 5: If you choose you can tie some festive ribbon onto the bakers twine. Then hang and enjoy!

12 Days of Cheer! DIY Holiday Pet Garland using Milkbones! via Ammo the Dachshund

Had I know this Cookie Garland was just for looks and not for nibbling I might not have been as excited to make it.

12 Days of Cheer! DIY Holiday Pet Garland using Milkbones! via Ammo the Dachshund

Despite the red spray paint I can still smell the cookies underneath, so make sure you hang your garland out of reach of any furry friends! Mom says it might smell good, but they won’t taste good! Ammo the Dachshund

This diy was inspired by the following halloween decorating tutorial.

12 Days of Cheer! DIY Holiday Dog Ornaments

One of my favorite things about the holidays is decorating the house with lots of Christmas Cheer! So this year my mom decided to help me make some festive ornaments to hang on my tree. These DIY Holiday Dog Ornaments will add a little WOOF to any home!

12 Days of Cheer! Ammo the Dachshund's DIY Holiday Dog Ornaments

Supplies:

12 Days of Cheer! Ammo the Dachshund's DIY Holiday Dog Ornaments

12 Days of Cheer! Ammo the Dachshund's DIY Holiday Dog Ornaments

Step 1: After choosing photos of your pet to use (it helps if they have a white background) print them out on your iron-on transfer paper. Follow the directions on the package for printing, and remember to mirror your image.

12 Days of Cheer! Ammo the Dachshund's DIY Holiday Dog Ornaments

Step 2: Cut your images out of the print-out.

Step 3: Iron on your images to your white fabric, making sure you follow the directions on your iron-on transfer paper package.

12 Days of Cheer! Ammo the Dachshund's DIY Holiday Dog Ornaments

Step 4: Cut each image out of your fabric, making sure to leave at least a 1 inch space around each image. By using something as a template you can also cut them out in the shape of a circle, which will be easier to sew down the line.

12 Days of Cheer! Ammo the Dachshund's DIY Holiday Dog Ornaments

Step 5: Next you will want to cut shapes out of your colorful Christmas fabric that are the same size as the images. These will serve as the backing for your ornament.

12 Days of Cheer! Ammo the Dachshund's DIY Holiday Dog Ornaments

Step 6: Using the baker’s twine you’ll want to cut a small piece and tie it into a bow. Then with your needle and thread stitch your bow onto the image transfer of your pet.

12 Days of Cheer! Ammo the Dachshund's DIY Holiday Dog Ornaments

Step 7: Then you will want to sew your ornament together. Place your colored fabric ONTOP of your image and then using your sewing machine (or by hand) stitch nearly all the way around your ornament, leaving about a 1/2 an inch of the fabric un-sewn.

Step 8: Flip your sewn ornament inside out so that now the image is on the outside. Then stuff with cotton.

Step 9: Cut a piece of bakers twine to be used to hang your ornament and knot it into a loop. Then using a needle and thread stitch the top of your ornament (and the loop) closed.

12 Days of Cheer! Ammo the Dachshund's DIY Holiday Dog Ornaments

Step 10: Marvel in your diy-ness and enjoy your new ornaments!

12 Days of Cheer! Ammo the Dachshund's DIY Holiday Dog Ornaments

I’m thoroughly enjoying my new ornaments, and I think they’re super cute !

12 Days of Cheer! Ammo the Dachshund's DIY Holiday Dog Ornaments

12 Days of Cheer! Ammo the Dachshund's DIY Holiday Dog Ornaments

I bet you can guess which one’s my favorite! Ammo the Dachshund

*The photos used for my ornaments were from the lovely Brenda Carpenter & The Mutt Room!

Birthday Week: DIY Dachshund Gift Wrap

ammo the dachshund birthday weekIt’s no surprise that I belong to a family of artists. My Dad is a graphic designer, my Mom is a custom framer & artist, and my pony friends (as well as myself) are painters – so when we wrap gifts – we go all artsy fartsy! Because the presentation is everything! (well at least until you rip that thing to shreds).

Even though today is my Birthday, my mom says I’m not allowed to open any presents until tonight when Dad can watch too….what a bummer! I bet you are waiting in anticipation just like I am! So hopefully this DIY DACHSHUND GIFT WRAP TUTORIAL (aka how to make your pup’s Birthday extra special) will help hold you over until it’s time to rip open my gifts.

So here’s a little inside look at how my Mom made my Birthday presents extra special this year!

diy dachshund gift wrap

Materials Needed:

Kraft Paper
– Carve-able Rubber Stamp Material
– Stamp Carving tools & Exacto Knife
– Rubber Stamp Pad
– Black Thin-line Sharpie
– Printer paper & Pencil
– Bone Folder (credit card will work too)

diy dachshund gift wrap

1. Using your printer paper and a pencil draw or trace the shape you would like to make into a rubber stamp. In this case my mom drew a balloon & a picture of me!

diy dachshund gift wrap

2. Transfer your pencil drawing onto the rubber stamp carving material by burnishing the back of it using your bone folder. Using a credit card would also work too. Then with an exacto knife cut your drawings out of the block.

diy dachshund gift wrap

3. Carve out your rubber stamp using your tools. You can test the stamp periodically by inking & stamping it onto a piece of scrap paper.

diy dachshund gift wrap

4. Stamp your design all over the kraft paper. Then using a thin-line sharpie connect the balloon shape to your dachshund.

ammo the dachshund free gift tags

Make sure you dress up your package extra spiffy with Baker’s Twine & Washi Tape – because gifts can never be too pretty. Add a gift tag by downloading our FREE PRINTABLE GIFT TAG. (download)

ammo the dachshund free gift tags

Check back soon to see how you can win your very own roll of Dachshund Gift Wrap, because Birthdays are more fun when you share!

To learn more about how to carve your own rubber stamps visit this Blog.